
Introduction: The "Untrusted Code" Problem
In the world of Kubernetes, kubectl apply -f deployment.yaml is a powerful command. Too powerful.
By default, a GKE cluster will happily try to run any container image you tell it to, from any registry, regardless of its origin or vulnerability status. This is a massive security gap. In a modern DevSecOps environment, we need a way to cryptographically prove: "This container was built by our trusted CI/CD pipeline, passed all security scans, and hasn't been tampered with."
The solution is Google Cloud Binary Authorisation.
Binary Authorisation is a deploy-time security control that acts as a gatekeeper for GKE. It ensures that only images with a valid, verifiable "signature" (attestation) from a trusted authority are allowed to run.
In this article, we will build a secure supply chain where Cloud Build signs an image, and GKE rejects any attempt to deploy it without that signature.
The Architecture: The Trust Pipeline
We are building a chain of trust. The developer pushes code, Cloud Build builds the container, signs it using a private key from Cloud KMS, and stores the signature. When GKE tries to pull the image, it verifies that signature using the corresponding public key.
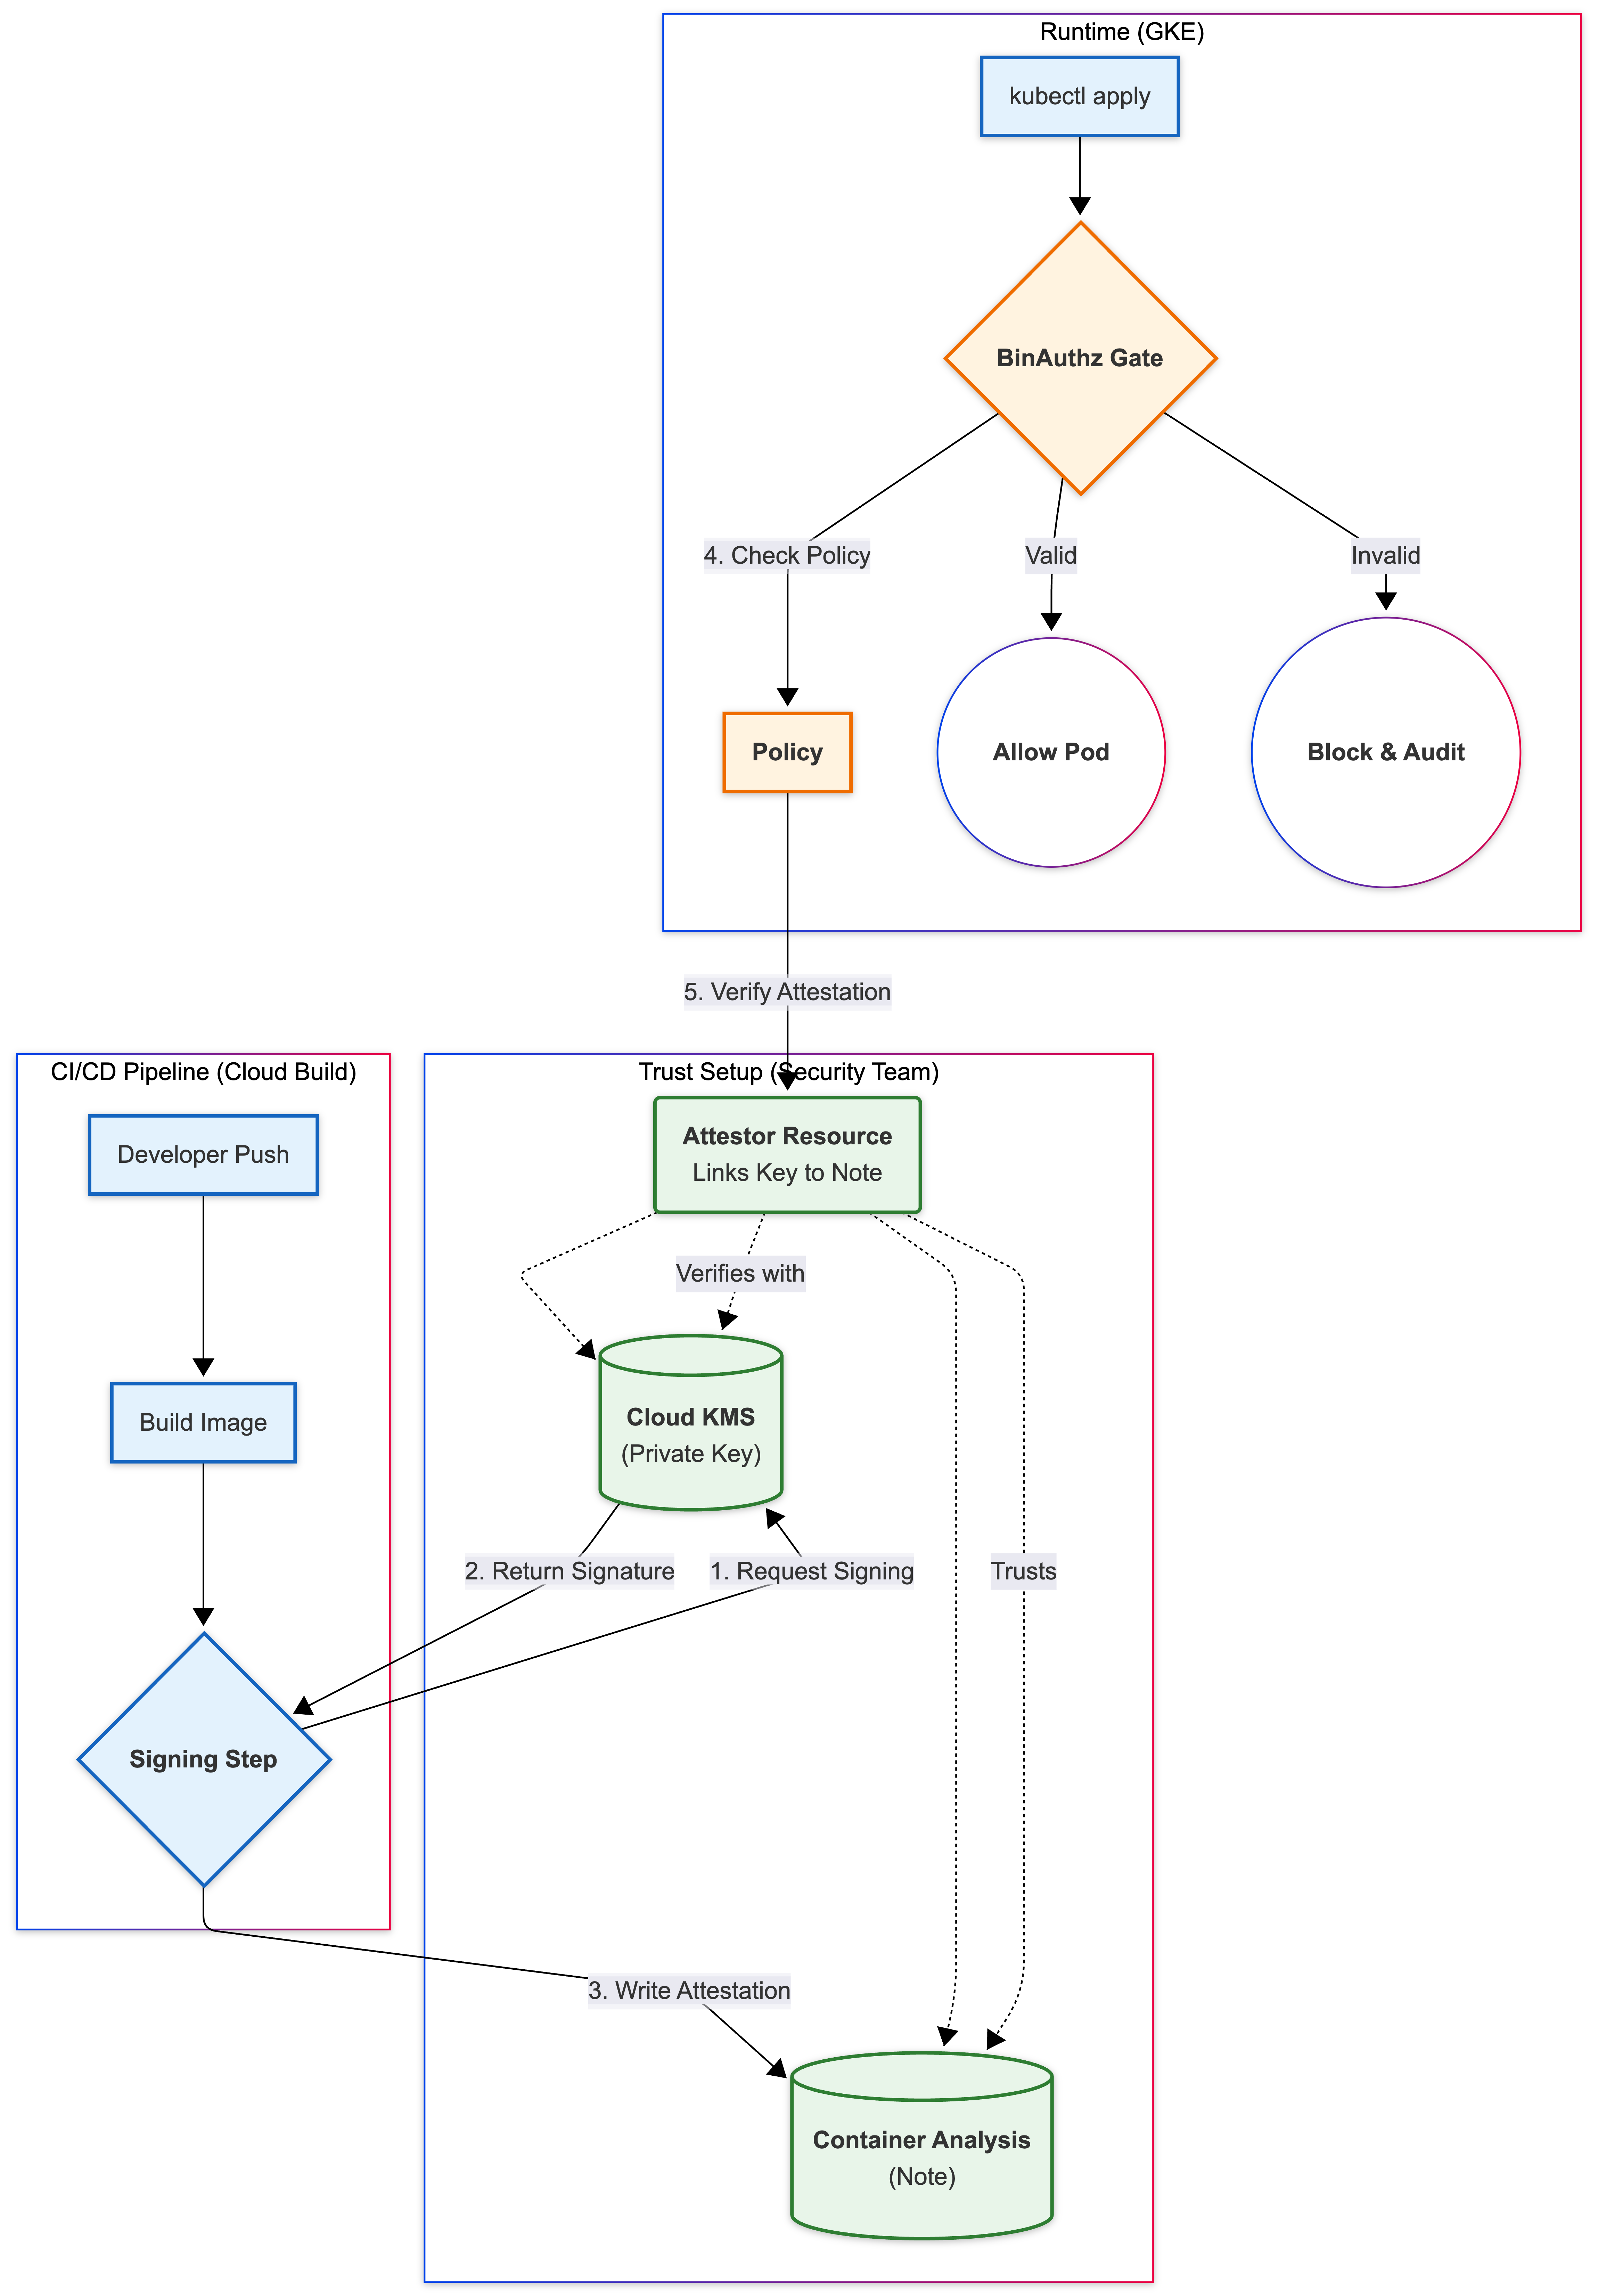
Core Components Explained
- Cloud Key Management Service (KMS): Stores the cryptographic keys used for signing. We use an asymmetric key pair (private key to sign, public key to verify).
- Attestor: A Google Cloud resource that represents a trusted identity. It links a specific KMS key to a "Note" in Container Analysis.
- Cloud Build: Our CI/CD platform. It will build the image and act as the "signer," creating an attestation.
- Binary Authorisation Policy: The rule set on the GKE cluster that enforces signature verification.
Implementation Guide: Step-by-Step
Let's define our variables. We have one project: my-secure-project.
Prerequisites: API Enablement
Before starting, ensure the necessary Google Cloud APIs are enabled for your project:
Phase 1: Establishing Trust (Keys & Attestors)
Step 1: Create the Asymmetric Key Pair in KMS This key is the root of our trust. The private key will be used by Cloud Build to sign images.
Step 2: Create the Container Analysis Note A "Note" is a piece of metadata that will be attached to container images. Think of it as a blank label waiting to be stamped.
Step 3: Create the Attestor Now we link the Note to our KMS key. This creates the "Attestor" entity that GKE will trust.
Phase 2: The Build & Sign Process
We need to configure Cloud Build to sign images after building them.
Step 1: Grant Permissions to Cloud Build The Cloud Build service account needs permission to view the Note, use the KMS private key, and create attestations.
Step 2: The cloudbuild.yaml pipeline
This is a standard build, followed by a dedicated "sign" step using Google's binauthz-attestation builder.
Phase 3: Enforcing the Policy on GKE
Step 1: Enable Binary Authorisation on the Cluster
If creating a new cluster, add --binauthz-evaluation-mode=PROJECT_SINGLETON_POLICY_ENFORCE. For an existing cluster:
Step 2: Configure the Policy
Binary Authorisation policies are cluster-scoped. We will configure a rule for my-cluster that enforces our attestation.
(Save this as policy.yaml)
Note: We set defaultAdmissionRule to ALWAYS_DENY to ensure a secure-by-default posture. Crucially, we have populated admissionWhitelistPatterns with standard Google registries (such as gke.gcr.io and k8s.gcr.io). This ensures that essential system workloads (like kube-dns) are not accidentally blocked by our strict policy, while still enforcing signature verification on all applications deployed to my-cluster.
Apply the policy:
Final Verification
- Test Deny: Try to deploy an unsigned image (e.g.,
nginx:latest) to the cluster. GKE will reject it with an error mentioning Binary Authorisation. - Test Allow: Run the Cloud Build pipeline to create and sign your image. Then, deploy that specific signed image digest to the cluster. GKE will verify the signature and allow the deployment.
Emergency Protocols: Breaking Glass
In a critical incident (e.g., Cloud Build is down, but you must deploy a hotfix), you can bypass Binary Authorisation without needing special IAM permissions to edit the policy. You only need standard Kubernetes permissions to deploy workloads.
The security mechanism here is not prevention, but auditing. When you use this bypass, GKE admits the deployment but immediately generates a high-severity entry in Cloud Audit Logs.
To bypass the check, simply add the break-glass annotation to your Pod specification:
This will allow the deployment but will generate a specific "Break Glass" entry in Cloud Audit Logs, alerting your security team that an emergency bypass occurred.
Addendum: Troubleshooting Common Failures
Even with a perfect setup, deployments can fail. Use this guide to diagnose the most common Binary Authorisation errors.
1. Error: Denied by Attestor
- The deployment is blocked with a message stating
Image ... denied by attestor .... The image was not signed, or the signature does not match the specific Attestor defined in the policy. - Fix:
- Verify Execution: Check Cloud Build logs to ensure the "Sign" step ran successfully.
- Check Digest: Ensure you are deploying the exact image
digest(e.g.,image@sha256:abc...) that was built. Binary Authorisation blocks mutable tags like:latestby default because they can change after signing.
2. Error: PermissionDenied on KMS
- The Cloud Build log fails at the signing step with
Permission denied. The Cloud Build Service Account is missing theroles/cloudkms.signerVerifierrole on the specific cryptographic key. - Fix: Re-run the IAM binding command to grant the Service Account access to the specific KeyRing/Key.
3. Error: Attestor not found
- GKE or Cloud Build complains it cannot locate the Attestor resource. Project mismatch. The command is looking for the Attestor in your current
gcloudconfig project, but the Attestor usually resides in a dedicated security project. - Fix: Always specify the flag
--attestor-project=my-secure-projectexplicitly in your CLI commands.
Architectural Analysis
Pros
- Cryptographic Certainty: Prevents "man-in-the-middle" attacks on your image registry. You know exactly what code is running.
- Policy-as-Code: Deployment rules are centralised, version-controlled, and auditable.
- Compliance: Meets strict regulatory requirements for software supply chain security (e.g., SSDF, SLSA).
Cons
- Complexity: Significant setup overhead involving KMS, IAM, and Container Analysis APIs.
- Operational Friction: Requires disciplined pipeline management. Developers cannot simply "push and deploy" from their laptops; everything must go through the trusted signer.
Conclusion
Securing the software supply chain is no longer optional. Binary Authorisation provides the missing link between your CI/CD process and your runtime environment, ensuring that the trust you build in your pipeline is cryptographically enforced at the cluster gate. It's a fundamental pillar of a mature DevSecOps posture on Google Cloud.
References & Further Reading
- Binary Authorisation Overview: Official Documentation
- Creating Attestors: Setting up Attestors
- Cloud Build Integration: Signing images with Cloud Build