
Many organisations start their cloud journey with a simple "Lift and Shift" (Rehosting). They take their VMs from on-premises and run them on Google Compute Engine (GCE).
This works, but it quickly hits a ceiling.
Managing individual VMs, patching OS kernels, and handling manual scaling scripts inevitably becomes an operational bottleneck. You want the agility of Kubernetes (GKE), but rewriting your entire legacy application into microservices overnight is an impossible ask.
The solution? A modernisation bridge using Cloud Service Mesh (formerly Anthos Service Mesh).
In this guide, I will walk you through the process of refactoring a multi-tier VM-based application into GKE containers without rewriting a single line of code, and how to use a service mesh to instantly gain modern capabilities like zero-trust mTLS, deep observability, and granular traffic splitting.
The Architecture
We start with a classic 3-tier architecture running on GCE Managed Instance Groups (MIGs). We will containerise these tiers one by one and deploy them to a GKE cluster.
Crucially, we will integrate Cloud Service Mesh (Istio). This securely decouples the application logic from the network and security logic.
Core Components Explained
- Migrate to Containers: Google's automated tool to extract a running VM disk into a deployable Docker container artifact.
- GKE Standard/Autopilot Cluster: The orchestration platform that replaces our manual VM management.
- Cloud Service Mesh: Google's fully managed distribution of Istio. It provides a dedicated infrastructure layer for reliable, secure, and observable communication between services.
- The Data Plane: The proxies (traditionally Envoy sidecars deployed alongside your app, or modern node-level "Ambient" proxies) that intercept and manage all network traffic.
Implementation Guide: Step-by-Step
Let's assume we have a legacy frontend VM and a backend VM.
Phase 1: Containerisation (The "Lift")
Step 1: Containerise the Application
If you have the source code, write a Dockerfile. If not, use Migrate to Containers to generate a container image directly from the running VM.
Example Dockerfile for a legacy Python app:
FROM python:3.8-slim
WORKDIR /app
COPY . /app
RUN pip install -r requirements.txt
# Ensure only a single process runs; strip out background VM tasks like cron or sshd
CMD ["gunicorn", "-b", "0.0.0.0:8080", "main:app"]
Build and push this to Google Artifact Registry.
Step 2: Create the GKE Cluster Create a modern cluster ready to join your enterprise fleet.
gcloud container clusters create modern-cluster \
    --region=us-central1 \
    --workload-pool=my-project.svc.id.goog \
    --enable-mesh-certificates
Phase 2: The Mesh Injection (The "Shift")
Step 1: Enable Cloud Service Mesh (Managed Control Plane) Google provisions and manages the Istio control plane for you, drastically reducing operational overhead.
# Register the cluster to your Fleet
gcloud container fleet memberships register modern-cluster \
    --gke-cluster=us-central1/modern-cluster \
    --enable-workload-identity

# Enable the managed Service Mesh feature
gcloud container fleet mesh enable
Step 2: Label the Namespace This is the magic step. Any pod deployed to this namespace will automatically integrate with the mesh data plane.
kubectl label namespace default istio-injection=enabled
Step 3: Deploy the Application Deploy your standard Kubernetes Deployment and Service manifests.
apiVersion: apps/v1
kind: Deployment
metadata:
  name: frontend
spec:
  replicas: 3
  selector:
    matchLabels:
      app: frontend
  template:
    metadata:
      labels:
        app: frontend
    spec:
      containers:
        - name: frontend
          image: us-central1-docker.pkg.dev/my-project/repo/frontend:v1
          ports:
            - containerPort: 8080
Apply this with kubectl apply -f frontend.yaml.
Phase 3: Unlocking Modern Features (without Code Changes)
Now that our legacy app is inside the mesh, we can execute strategies that were highly complex on bare GCE VMs.
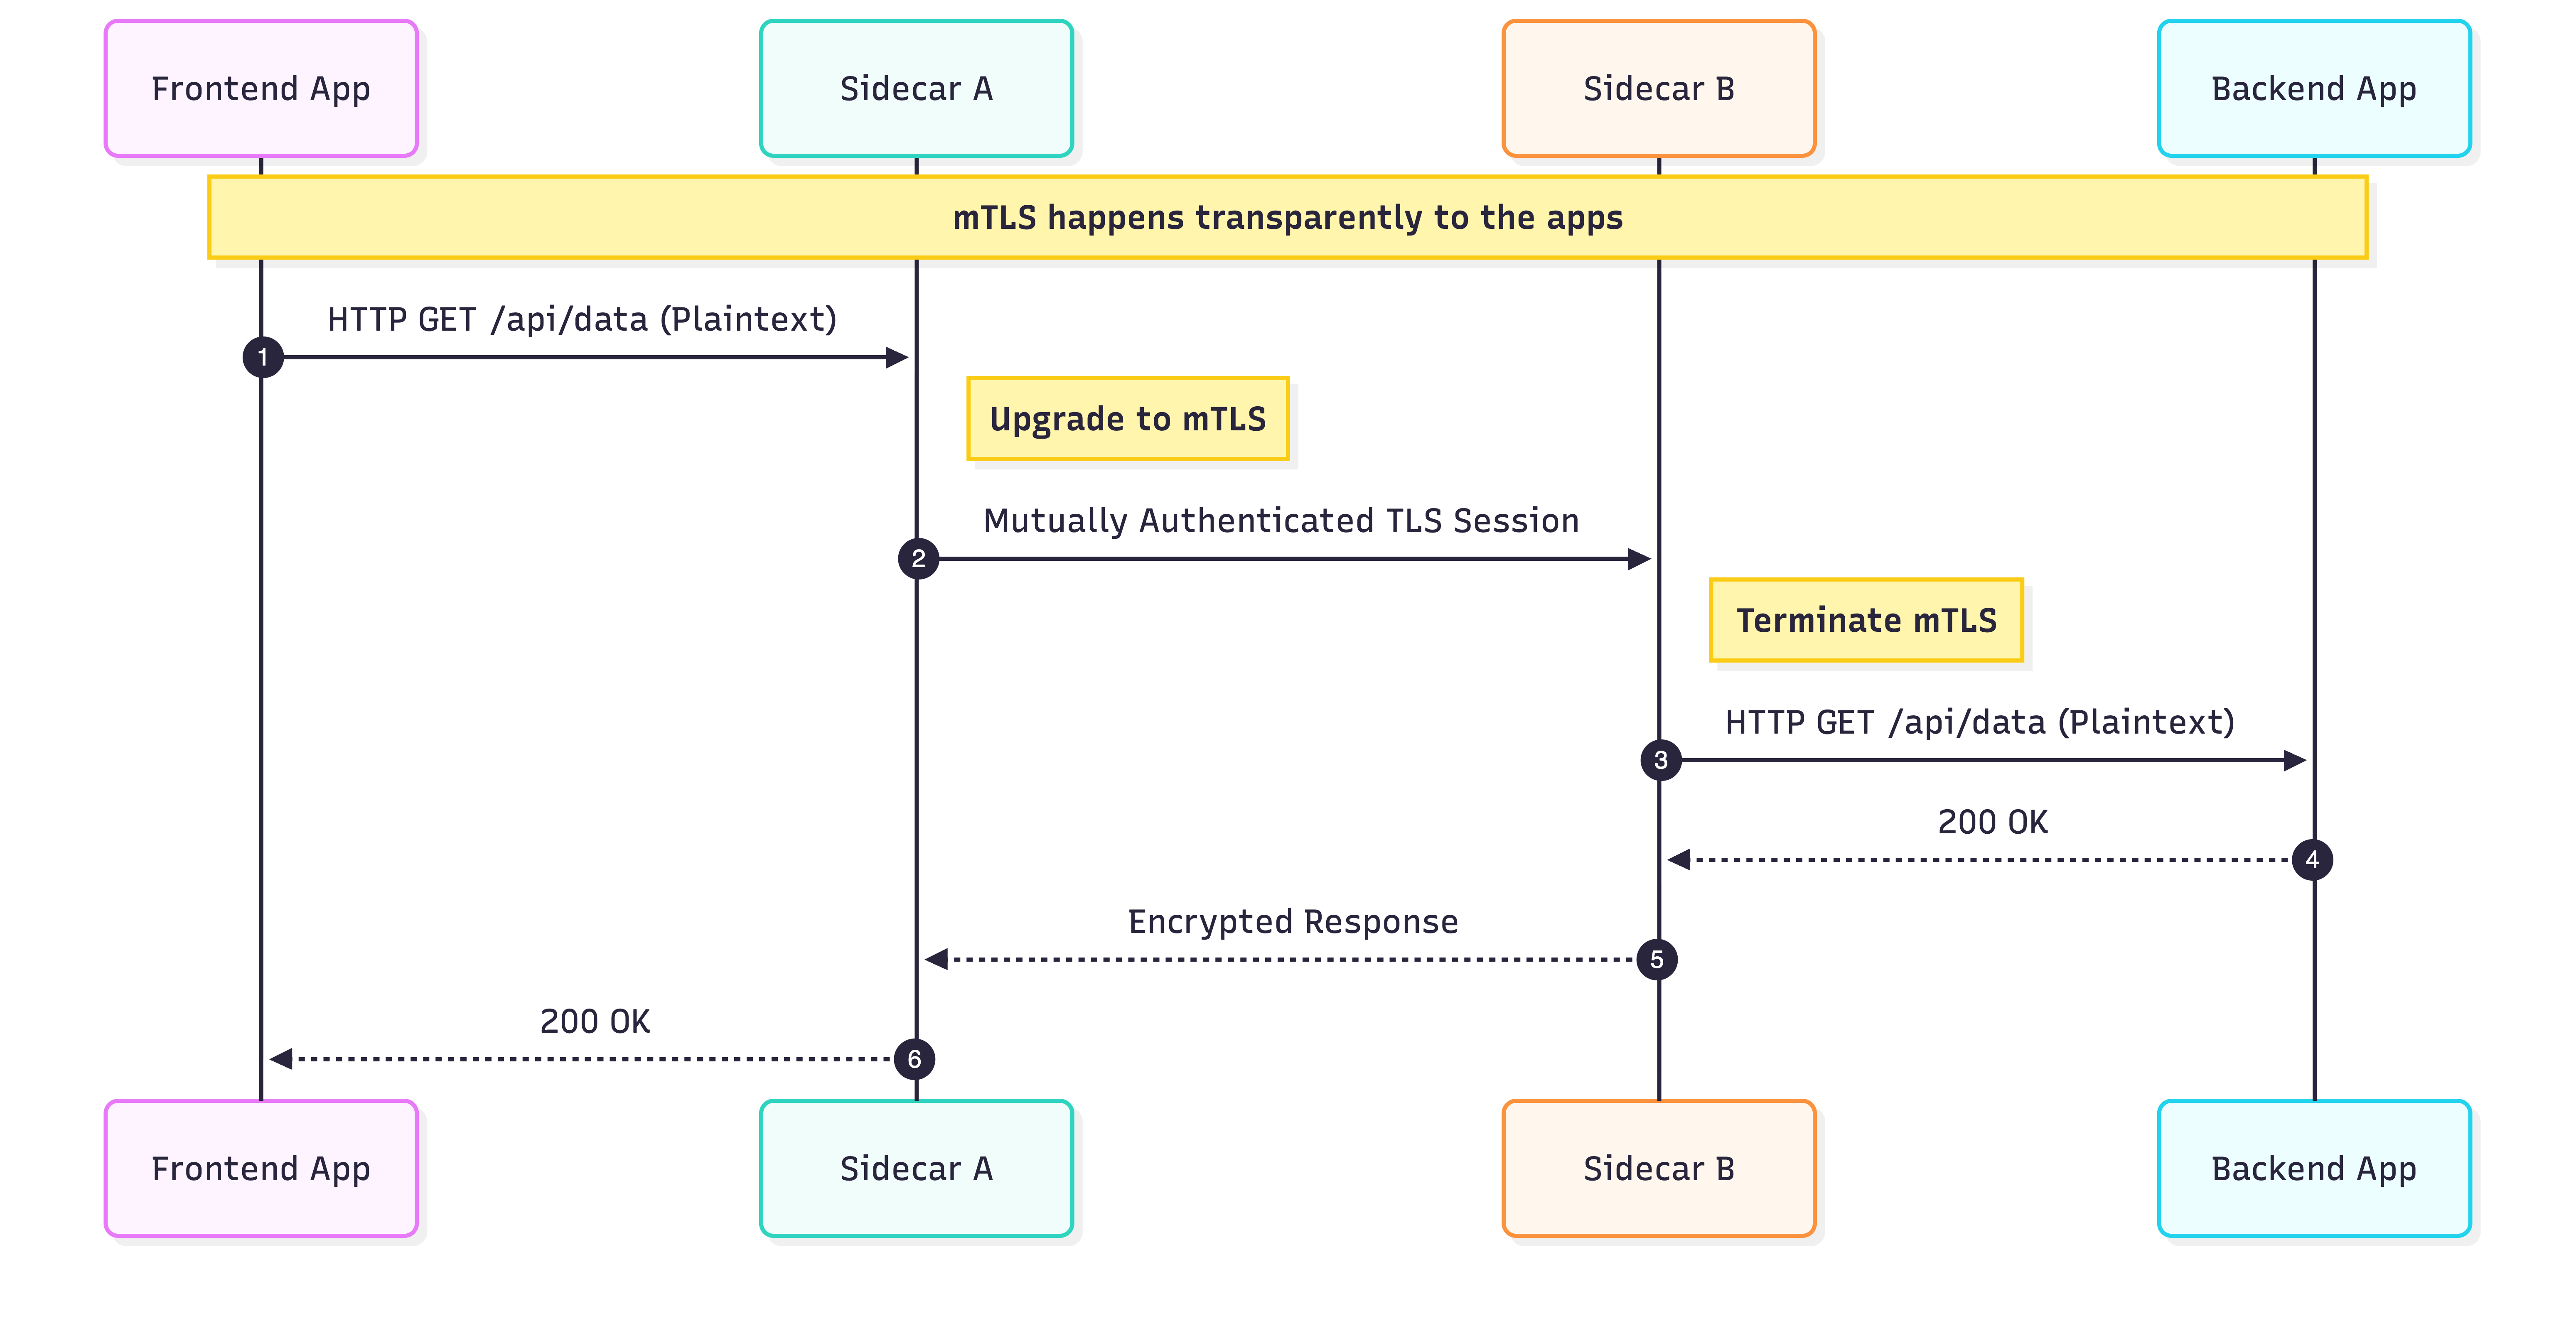
Feature A: Zero-Trust Security (mTLS) Cloud Service Mesh can enforce strict mutual TLS between all services by default. You no longer need to manually rotate certificates or implement HTTPS within your application code.
# Enforce mTLS strictly across the namespace
apiVersion: security.istio.io/v1beta1
kind: PeerAuthentication
metadata:
  name: default
  namespace: default
spec:
  mtls:
    mode: STRICT
Feature B: Traffic Splitting (Canary Deployments)
Want to safely roll out frontend:v2 to only 10% of users? On GCE, this required complex load balancer gymnastics. With the mesh, it's a simple declarative policy:
apiVersion: networking.istio.io/v1alpha3
kind: VirtualService
metadata:
  name: frontend
spec:
  hosts:
    - frontend
  http:
    - route:
        - destination:
            host: frontend
            subset: v1
          weight: 90
        - destination:
            host: frontend
            subset: v2
          weight: 10
Architectural Analysis
Pros
- Decoupled Responsibilities: Security and Ops teams can enforce mTLS, retries, and timeouts via policy without asking developers to refactor legacy code.
- Out-of-the-Box Observability: You instantly unlock a dynamic "Service Topology" graph in the Google Cloud Console, detailing golden signals (latency, traffic, errors) between services.
- Compute Density: GKE bin-packs containers much more efficiently than single-tenant VMs, noticeably reducing underlying compute costs.
Cons & Considerations
- Learning Curve: Introducing Kubernetes and a Service Mesh simultaneously requires dedicated upskilling for traditional infrastructure teams.
- Data Plane Overhead: Traditional Envoy sidecar proxies consume a small amount of CPU/RAM per pod and add single-digit millisecond latency. Note: Modern Istio implementations like Ambient Mesh are actively solving this by introducing a sidecar-less, node-level proxy architecture (ztunnel), making the mesh virtually invisible to the workload.
Common Roadblocks & Troubleshooting
1. The "Health Check" Fail When you enable strict mTLS, standard external GKE health checks might fail because the Google Cloud load balancer doesn't speak mTLS to your pods.
- The Fix: Use Istio's
RequestAuthenticationpolicy to safely bypass mTLS exclusively for health check paths, or utilise backend service annotations.
2. The "Fat Container" Startup If you containerised an entire VM as-is, the pod startup time might be agonisingly slow (minutes).
- The Fix: Ensure you strip out legacy background processes (
cron,sshd,syslog) from the container's entrypoint. A cloud-native container should run one main process.
Conclusion
Transitioning from GCE to GKE is not just about changing where your code runs; it's about fundamentally upgrading how you operate it. By layering Cloud Service Mesh over your containerised legacy apps, you gain "superpowers" like instant zero-trust networking and deep observability that would typically take months of engineering to build manually. This architecture is the ultimate bridge between legacy workloads and modern infrastructure.
References & Further Reading
- Migrate to Containers: Overview & Guide
- Cloud Service Mesh: Managed Control Plane Guide
- Istio Traffic Management: Traffic Splitting Concepts